Figuring out how to mount a projector on the ceiling begins with a bit of technical homework. For example, calculating both vertical and horizontal lens shift is crucial to ensure the correct placement of your projector. You’ll also need to put in some physical effort for the installation process. Even the best projectors will require some elbow grease to get them set up.
KEY TAKEAWAYS:
- The first step for installing projector mounts is determining whether you can buy a universal version or if your projector requires brand-specific mounting.
- Always use a stud finder to locate a safe place for your projector mounts, and then follow the directions laid out by the manufacturer.
- When installing projector mounts, always calculate both the vertical and horizontal lens shift so that you always have correct screen placements for your presentations.
Mounting Your Projector Ceiling Plate
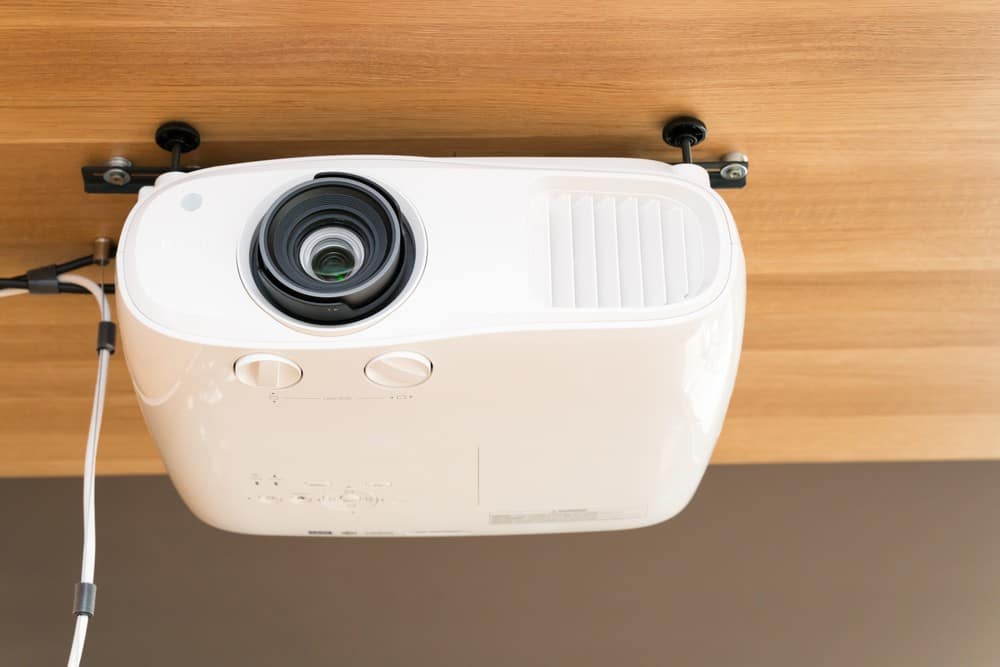
Learning how to mount a projector on the ceiling involves a technical understanding of values like vertical lens shift, but it isn’t impossible. A ceiling mount is easy for the average person to install, so long as you place the projector bracket correctly. Most ceiling projectors will come with a ceiling kit to make installation easier. For more information, you should look into how to set up a home theater projector. The majority of projectors don’t need to be ceiling mounted.
Insider Tip
Keeping horizontal lens shift in mind when installing your projector brackets will ensure your imagery shows up correctly on the screen.
STEP 1 Find the Right Place for Your Ceiling Mount
Installation costs skyrocket if you drill holes just to find out it’s the wrong place for your projector plate. Before drilling holes, make sure the ceiling surface can support the weight of your projector by using a stud finder. Always attach projector brackets to a solid area such as a wooden stud. Otherwise, you run the risk of damaging your drywall and device since the drywall has a low load capacity. Make sure there’s an outlet for your power cable nearby, as well. If you’re tired of messy wires, look into how to make a projector wireless.
STEP 2 Figure Out the Correct Vertical Placement
After you’ve confirmed the load capacity of your placement, figure out the vertical lens shift. This refers to the complementary relationship between the projector lens and the projector screen. Vertical offset is the idea that you must set the projector back an exact distance so you can see a precise picture over your entire screen. Mounting the projector without looking into the vertical lens shift will result in projector screen imagery offset. Finding the vertical offset gives you the ideal screen placement for your ceiling-mounted projector with dead center imagery.
STEP 3 Place Your Projector Bracket Mounts
Once you have the projector plate placement figured out, it’s time to place the screw holes. Each ceiling-mounted projector will have different directions. Follow them closely to ensure correct installation. The ease of installation hinges on the proper placement of your projector bracket.
STEP 4 Begin the Installation Process
For easy installation of your projector, always refer to the directions of projector manufacturers. The installation process shouldn’t be too complicated. Read the projector’s product description thoroughly before purchasing to ensure compatibility with your ceiling-mounted projector. As long as you buy the correct projector ceiling mounts, you’ll easily install the projector ceiling plate.
STEP 5 Enjoy Your New Projector
Once your projector is all set up, you can focus on getting the screen placed. Most projectors will be easy to troubleshoot, but you should always have the instructions manual handy. Follow the installation process word for word, and it should be a painless process.
Warning
Before buying a universal mount, make sure that your projector will fit into it safely and that the projector bracket can handle its weight.
F.A.Q.S
What is vertical offset, and is it important?
Vertical offset refers to how high or low to place projector mounts. Keeping vertical offset in mind ensures that you see a precise picture correctly positioned on the screen, and it’s crucial to avoid future picture adjustment.
How important is controlling ambient light?
If you have a lot of direct light coming in, accurate colors are challenging to achieve. Use a blackout curtain on windows to keep outside light from filtering in.
Does screen size matter for overall experience?
Screen size can significantly enhance your viewing experience. However, ideal screen placement matters more than screen size.
Are projector ceiling mounts universal?
Most projector mounts are universal, but you always should make sure. If your projector ceiling plate requires permanent installation, correct installation becomes even more critical.
STAT: In July 2016, over 40% of American households said they owned a home theater system or surround sound. (source)
REFERENCES:










![Best Projectors for Daylight Viewing in [year] 27 Best Projectors for Daylight Viewing in 2026](https://www.gadgetreview.dev/wp-content/uploads/best-projector-for-daylight-viewing-image.jpg)
![Best Samsung Projectors in [year] 28 Best Samsung Projectors in 2026](https://www.gadgetreview.dev/wp-content/uploads/best-samsung-projectors-image.jpg)
![Best NEC Projectors in [year] 29 Best NEC Projectors in 2026](https://www.gadgetreview.dev/wp-content/uploads/best-nec-projectors-image.jpg)
![Best Acer Projectors in [year] 30 Best Acer Projectors in 2026](https://www.gadgetreview.dev/wp-content/uploads/best-acer-projectors-image.jpg)
![Best Quiet Projectors in [year] 31 Best Quiet Projectors in 2026](https://www.gadgetreview.dev/wp-content/uploads/best-quiet-projector-image.jpg)
![Best Projectors for Golf Simulator in [year] 32 Best Projectors for Golf Simulator in 2026](https://www.gadgetreview.dev/wp-content/uploads/best-projector-for-golf-simulator-image.jpg)
![Best Conference Room Projectors in [year] 33 Best Conference Room Projectors in 2026](https://www.gadgetreview.dev/wp-content/uploads/best-conference-room-projector-image.jpg)
![Best InFocus Projectors in [year] 34 Best InFocus Projectors in 2026](https://www.gadgetreview.dev/wp-content/uploads/best-infocus-projectors-image.jpg)
![Best Mini Projector in [year] ([month] Reviews) 35 Best Mini Projector in 2026 (January Reviews)](https://www.gadgetreview.dev/wp-content/uploads/best-mini-projector-image.jpg)
![Best Panasonic Projectors in [year] 36 Best Panasonic Projectors in 2026](https://www.gadgetreview.dev/wp-content/uploads/best-panasonic-projectors-image.jpg)
![Best Sony Projectors in [year] 37 Best Sony Projectors in 2026](https://www.gadgetreview.dev/wp-content/uploads/best-sony-projectors-image.jpg)
![Best Projector Stands in [year] 38 Best Projector Stands in 2026](https://www.gadgetreview.dev/wp-content/uploads/best-projector-stand-image.jpg)
![Best Ultra Short Throw Projectors in [year] 39 Best Ultra Short Throw Projectors in 2026](https://www.gadgetreview.dev/wp-content/uploads/best-ultra-short-throw-projector-image.jpg)
![Best Projectors for a Living Room in [year] 40 Best Projectors for a Living Room in 2026](https://www.gadgetreview.dev/wp-content/uploads/best-projector-for-living-room-image.jpg)
![Best RCA Projectors in [year] 41 Best RCA Projectors in 2026](https://www.gadgetreview.dev/wp-content/uploads/best-rca-projectors-image.jpg)
![Best Optoma Projectors in [year] 42 Best Optoma Projectors in 2026](https://www.gadgetreview.dev/wp-content/uploads/best-optoma-projectors-image.jpg)
![Best BenQ Projectors in [year] 43 Best BenQ Projectors in 2026](https://www.gadgetreview.dev/wp-content/uploads/best-benq-projectors-image.jpg)
![Best Projectors for Church in [year] 44 Best Projectors for Church in 2026](https://www.gadgetreview.dev/wp-content/uploads/best-projector-for-church-image.jpg)
![Best Projectors for Classroom in [year] 45 Best Projectors for Classroom in 2026](https://www.gadgetreview.dev/wp-content/uploads/best-projector-for-classroom-image.jpg)
![Best Epson Projectors in [year] 46 Best Epson Projectors in 2026](https://www.gadgetreview.dev/wp-content/uploads/best-epson-projector-image.jpg)
