Electronics don’t like getting wet, and even the best hoverboards are no different. If you accidentally drive through a large puddle or leave your hoverboard out in the rain, then you might experience water damage that causes your board to malfunction. The device may stop functioning immediately after getting in contact with water. In some cases, the red lights may blink first before it finally stops working. While this may seem like dire straits, you might still be able to fix your problem as long as you act quickly and follow the correct steps. Keep reading to learn how to fix water on a hoverboard.
Tools Needed: Phillips head screwdriver
How to Fix Water Damage on Hoverboards
There are a number of steps you can take to fix water damage on a standard hoverboard (including how to fix a hoverboard when the red light comes on).
STEP 1 Turn Off the Hoverboard
As with any other electronic device, if you get your hoverboard wet, the first thing you should do is immediately turn it off. The longer you keep the board powered on, the higher the risk you run of destroying the entire device. When left on, electricity from the battery (here is how to test a hoverboard battery) will continue to pass through all of the internal components and eventually fry the wet pieces. Turning off the board will prevent shorts from occurring.
STEP 2 Get Your Tools
Next, it’s time to get handy. To dismantle your hoverboard, all you’ll need is a simple screwdriver (electric or manual) that matches the type of screw head keeping the shell together. Usually, you’ll only need a Phillips head screwdriver.
STEP 3 Dismantle the Hoverboard
Now that you’ve got your screwdriver, start dismantling the hoverboard, unscrewing the screws that keep the shell together. You can usually find these on the bottom side of the board. For the most part, you’ll only need to remove the bottom covers to access the electronic components inside. We recommend removing both bottom shells to ensure you locate all of the water that made its way into the board.
STEP 4 Disconnect the Battery
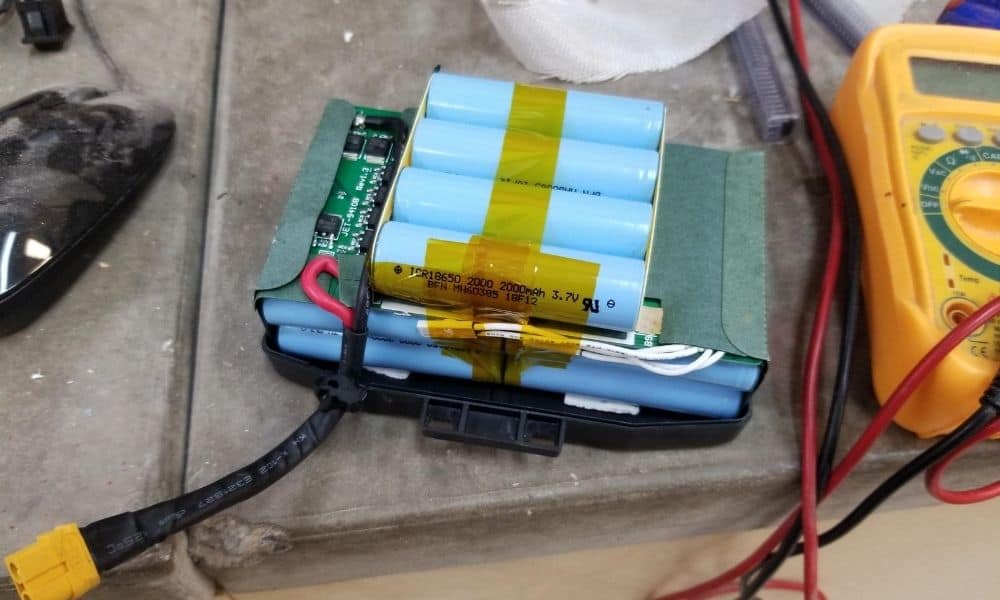
Even though your hoverboard is powered off, it’s still a good idea to disconnect the battery from the rest of the internal electronics. It’s always better to be safe than sorry, especially when there’s water involved. The battery is typically screwed directly into the hoverboard’s frame, so all you need to do is remove those screws and unplug the battery.
STEP 5Diagnose the Water Damage
Take some time to make a visual diagnosis of the water’s location inside your hoverboard. It should be pretty easy to spot. Look for water droplets or even small puddles of water to figure out where precisely the board got wet.
STEP 6 Dry the Affected Parts
After you’ve spotted all the water, it’s time to get drying. You may have heard the classic “put it in rice” trick for your smartphone, and the same principle applies to hoverboards. Remove the wet internal components by disconnecting wires and unscrewing screws where needed. Then, place them into a bowl of rice and keep them there for 12 to 24 hours. You may also want to do this with your battery if you suspect it got wet. Make sure to take some paper towels and dry off the hoverboard’s external casing, as well.
STEP 7 Clean Any Dirty Parts
If you drive through a dirty puddle, you’ll need to clean affected parts after they’re dry. Leftover debris can cause more problems down the road. To do this, wet some Q-Tips with rubbing alcohol and gently scrub dirty parts after they are completely dry. Use as many as you need to get a comprehensive clean.
STEP 8 Reassemble the Hoverboard
Once everything is dry and clean, it’s time to put your hoverboard back together again. Place the bottom shells back in their original position and use your screwdriver to re-screw them back into place. If you removed the battery, make sure you reconnect it and place it in its original position.
STEP 9 Power On the Hoverboard
Now that your hoverboard is back in one piece, it’s time to power it back on and see if your hard effort paid off. If your board starts up and runs well, then you’re good to go! Have fun riding your newly-repaired hoverboard, and try to avoid the puddles in the future
STEP 10What If It Doesn’t Work?
If your hoverboard doesn’t power on again or simply doesn’t work right after your troubleshooting, then you still might have hope. Contact the manufacturer and see if their warranty covers water damage or if they have an authorized repair center in your area. Unfortunately, if none of these options pan out, you may need to start looking for a replacement hoverboard.
Tips
Understand Your Hoverboard’s Water Tolerance
Most boards can handle a small degree of water – especially if they sport an IP water resistance rating – but we recommend avoiding it altogether. You don’t have to dash inside at the first sign of rain, but always avoid puddles and wet surfaces, even if you’re using one of the best off road hoverboards.
Screw Storage
When you’re disassembling your board, make sure you keep all your screws in one place so that you don’t have to replace those, too. Use a bowl or plate to keep them secure and safe in a nearby location.
Remember Where Everything Goes
Even the best hoverboards for kids can be complicated in their assembly. Take a picture of the insides of your fully-assembled hoverboard so that you remember exactly where everything goes. This way, when it comes to time to put it all back together again, you have a reference to make things easier. It is also crucial to know how to test the battery to ensure it functions optimally.
Reconnect Everything
Before you close the shell back up, do one more pass to make sure you reconnected everything you took apart. This way, you won’t have to disassemble the board again.
Warnings
Don’t Ride While Wet
If your hoverboard gets wet, power down immediately, even if it seems like it’s working fine. If you keep riding, the water can spread and cause irreparable damage.
Check Your Warranty
Before doing any repairs, check your warranty to see if water damage is covered. If it is, then you’ll want to contact the manufacturer directly for repair or a replacement. You may also void your warranty by trying the repair yourself.
Dry Everything Thoroughly
Make sure everything is thoroughly dry before turning your hoverboard back on. If even the slightest amount of water is present, you run the risk of frying the internal circuitry and ruining the entire board.
Drain Your Battery
You may want to let your battery drain completely before attempting to reconnect and power your board back on. This way, you’re more likely to get a completely dry battery and a better chance at everything working correctly.
F.A.Q.S
Can hoverboards get wet?
For the most part, no. The best self-balancing scooters are electronic devices, and electronic devices don’t mix well with water.
Are hoverboards waterproof?
Some hoverboards offer IP water resistance ratings. However, we still recommend avoiding contact with large amounts of water, just in case.
What should I do if my hoverboard gets wet?
If your hoverboard gets wet, you should power it down immediately and get to work drying it out following the steps found in this article.
Does it matter if my hoverboard electronics get wet?
Yes, it does matter immensely. If your hoverboard electronics get wet, you may experience shorts, which cause irreparable damage to the motherboard and other circuitry, which both power the device.
Is it mandatory to dismantle my hoverboard in case it gets into contact with water?
No, it’s not mandatory, especially if you’re not comfortable with the process. However, it is one of your only ways to try and save the hoverboard. The faster you act, the more chance you have of preventing permanent water damage.
REFERENCES:
- https://en.wikipedia.org/wiki/Self-balancing_scooter
- https://www.youtube.com/watch?v=xnCp-DJUCt8
- https://transporthistory.wordpress.com/2019/01/30/the-history-and-evolution-of-the-hoverboard-by-charles-watson/r
- https://www.cpsc.gov/s3fs-public/Hoverboard-Safety-Alert.pdf?mSAM5F_iz1JtmMI8UvtzohHxB6xSqARX
- https://www.nfpa.org/-/media/Files/Public-Education/Resources/Safety-tip-sheets/HoverBoard.ashx



![Best 10 Inch Hoverboards in [year] 27 Best 10 Inch Hoverboards in 2026](https://www.gadgetreview.dev/wp-content/uploads/best-10-inch-hoverboard-image.jpg)
![Best Single Wheel Hoverboards in [year] 28 Best Single Wheel Hoverboards in 2026](https://www.gadgetreview.dev/wp-content/uploads/best-single-wheel-hoverboard-image.jpg)
![Best 8 Inch Hoverboards in [year] 29 Best 8 Inch Hoverboards in 2026](https://www.gadgetreview.dev/wp-content/uploads/best-8-inch-hoverboard-image.jpg)
![Best Hoverboards for Girls in [year] 30 Best Hoverboards for Girls in 2026](https://www.gadgetreview.dev/wp-content/uploads/best-hoverboards-for-girls-image.jpg)
![Best Hoverboards for Adults in [year] 31 Best Hoverboards for Adults in 2026](https://www.gadgetreview.dev/wp-content/uploads/best-hoverboard-for-adults-image.jpg)
![Best Hoverboard Accessories in [year] 32 Best Hoverboard Accessories in 2026](https://www.gadgetreview.dev/wp-content/uploads/best-hoverboard-accessories-image.jpg)
![Best 6.5 Inch Hoverboards in [year] 33 Best 6.5 Inch Hoverboards in 2026](https://www.gadgetreview.dev/wp-content/uploads/best-6.5-inch-hoverboard-image.jpg)
![Best Bluetooth Hoverboards in [year] 34 Best Bluetooth Hoverboards in 2026](https://www.gadgetreview.dev/wp-content/uploads/best-bluetooth-hoverboards-image.jpg)
![Best Knee Pads for Hoverboards in [year] 35 Best Knee Pads for Hoverboards in 2026](https://www.gadgetreview.dev/wp-content/uploads/best-knee-pads-for-hoverboard-image.jpg)
![Best Hoverboard for Beginners in [year] 36 Best Hoverboard for Beginners in 2026](https://www.gadgetreview.dev/wp-content/uploads/best-hoverboards-for-beginners-image.jpg)
![Best Helmets for Hoverboards in [year] 37 Best Helmets for Hoverboards in 2026](https://www.gadgetreview.dev/wp-content/uploads/best-helmet-for-hoverboard-image.jpg)
![Best Hoverboard Carrying Bags in [year] 38 Best Hoverboard Carrying Bags in 2026](https://www.gadgetreview.dev/wp-content/uploads/best-hoverboard-carrying-bag-image.jpg)
![Best Hoverboard Seats in [year] 39 Best Hoverboard Seats in 2026](https://www.gadgetreview.dev/wp-content/uploads/best-hoverboard-seat-image.jpg)
![Best Hoverboard in [year] ([month] Reviews) 40 Best Hoverboard in 2026 (January Reviews)](https://www.gadgetreview.dev/wp-content/uploads/best-hoverboard-image.jpg)
![Fastest Hoverboard in [year] ([month] Reviews) 41 Fastest Hoverboard in 2026 (January Reviews)](https://www.gadgetreview.dev/wp-content/uploads/fastest-hoverboard-epikgo.jpg)
![Best Hoverboard For Kids in [year] ([month] Reviews) 42 Best Hoverboard For Kids in 2026 (January Reviews)](https://www.gadgetreview.dev/wp-content/uploads/Best-Hoverboards-For-Kids.jpg)
![Best RV Battery in [year] ( [month] Reviews) 44 Best RV Battery in 2026 ( January Reviews)](https://www.gadgetreview.dev/wp-content/uploads/best-rv-battery.jpg)
![Razor Hovertrax 2.0 Hoverboard Review in [year] 54 Razor Hovertrax 2.0 Hoverboard Review in 2026](https://www.gadgetreview.dev/wp-content/uploads/Razor-Hovertrax-2.0-Hoverboard-Review.jpg)
