It’s no lie to say that digital imaging has replaced convention film pretty much across the board. Digital cameras by their very nature can provide simpler routes to taking good pictures — with a memory card being the only “price” to pay after the image has been taken, and the near-instant gratification of seeing the picture shot a reality. Of course, using top of the range phones like the best iPhone can enhance the experience.
Cell phones have furthered digital imaging by eliminating the need for a dedicated camera. Even more so, the fact that pretty much everyone carries their cell phone around with them non-stop means that you’re never far from taking a digital picture.
The downside to all this has been the camera in the cell phone itself. Cell phone cameras are not designed with the same tolerances and specifications as found in a dedicated digital camera (though this is changing). As a result, you may always have a camera available (i.e., the cell phone), but you won’t have all of the options that a dedicated camera can offer.
One of these options is interchangeable lenses. Sure most cell phone cameras get around the lack of an optical zoom through digital technology, but the image quality always suffers as a result of doing that. Additionally, the ability to change the lens for one that is more specialized — or more focused for the particular photo that is to be shot – does not exist. For this reason you have Schneider Optics’ iPro Lens System.
Before anything else, lets note that the Schneider name brings a level of quality to any lens bearing its logo. When it comes to photography, just having the technology (i.e. The camera itself) to take an image isn’t enough — the lens taking that image has to be of a worthwhile level. Take it from one who has used Schneider lenses through the years, quality is definitely here.
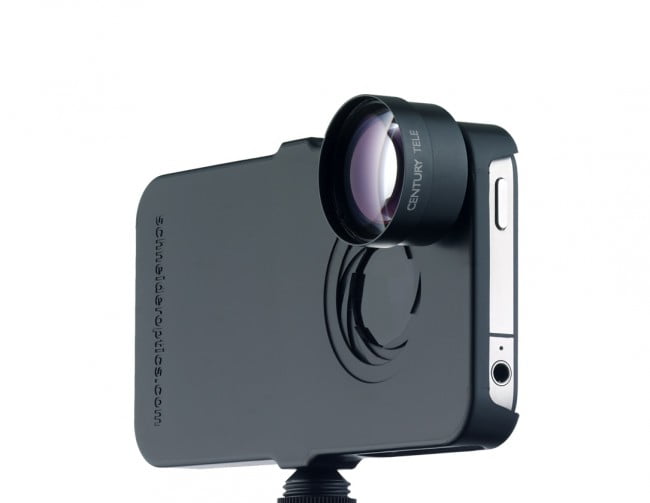
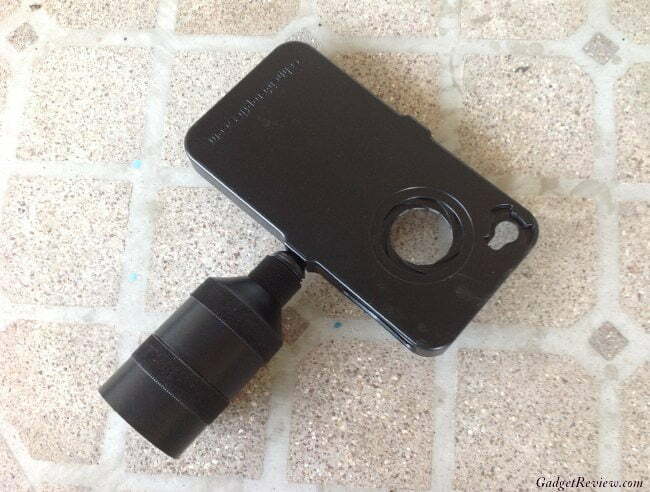
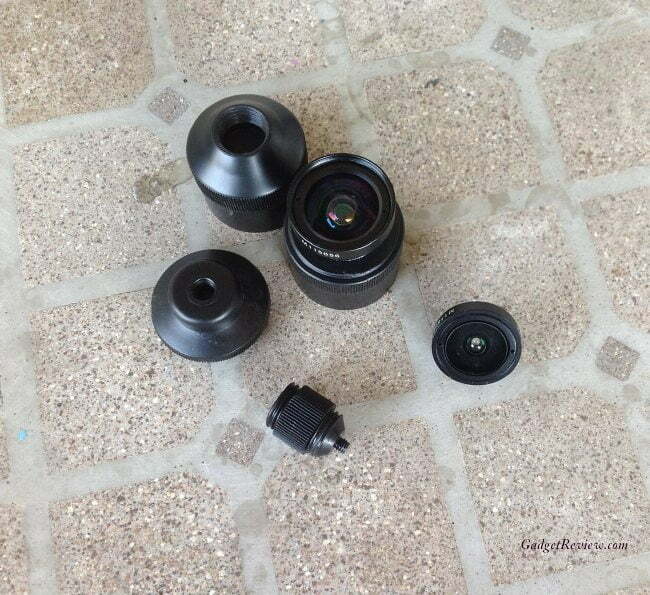
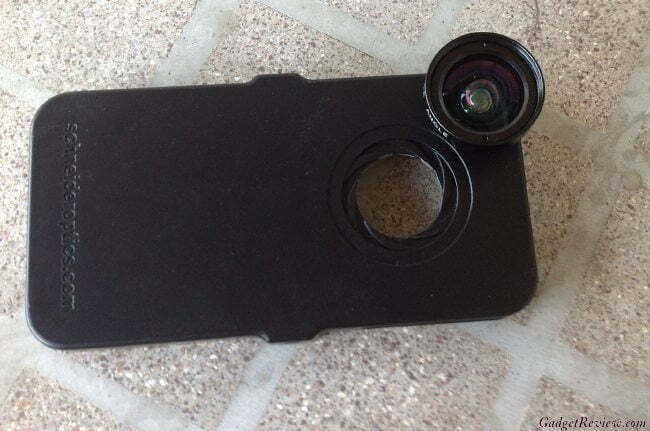
So before we get into what the iPro Lens System does, let’s look at what it is. To start, there’s a case that fits around an iPhone 4 or 4S — okay that provides protection against the phone being damaged as a matter of course, but what else does the case do? There’s a bayonet mount on it so that a lens can be attached to it: obviously the case fits the iPhone so as to line up this bayonet hole with its camera. That’s good, providing that there are lenses to use with it — so here they are. The kit comes with a wide angle lens and a fisheye lens. And to provide more shooting stability, a “handle” attaches to the case.
There’s a lot to this “handle,” so lets focus on it for a second (bad pun intended). This “handle” also provides storage for the lenses, but perhaps even more importantly, there’s a conventional tripod mount on the bottom so the entire iPhone/Case/Lens setup can stand on its own. Providing you have a tripod, that is. This tripod mount socket flips around with the one that is used for attaching the “handle” to the case — multi-tasking products are always appreciated. The “handle” is actually a multi-function unit: it physically holds the two lenses inside for safety (using the same bayonet locking mechanism as found on the case); it provides an insert that attaches to one of two sockets on the side of the case for a more stable hold; a tripod mount socket is built in so that the case can now be mounted to a tripod. It should also be noted that the insert going into the side of the case helps to make it possible to remove the iPhone from the case in a more safe and secure manner because once on, the case’s free tolerance to movement is highly restricted.
And for folks with 3GS or other iPhone models (even the new 5), don’t try and stick yours into the case — it’s built to fit the specifications of the 4/4S. End of story. That doesn’t mean that there won’t be a version with a case that fits the iPhone 5 (or even just the case as a separate purchase in the future), but for now you better have any iPhone 4 if you have the iPro Lens System.
Related: If you like this lens system, you might be interested in our Phocus iPhone Lens System review.
It took me about a minute to secure the iPhone into the case (taking my time and all), and I can see that the iPhone’s camera lens Is lined up with the bayoneted area hole on the case. I unscrew the “handle” to separate the sections — one lens is inside the part I just unscrewed while the other is deeper inside the part still in my hand. I select one of the very small lenses (the wide-angle) and screw it into the bayonet on the case. That didn’t take much effort. Now I return the parts of the “handle” back together and screw in the insert into one of the two holes on the case; which hole I use depends on how I want to orient the iPhone’s controls horizontally. Now I’m ready to shoot pictures with a completely different lens than what the iPhone came with. And yes I can hold it vertically if I prefer.
Just to note, you can fit the iPhone in your pocket in the usual manner if you want but…. The “but” being that the lens does stick out farther from the case than you’d be used to. Since there’s always the chance of accidentally tossing keys in the pocket, or some other object that might scratch or pull against the protruding lens, here it could be disastrous. So the best way to proceed is holding onto the iPhone while using the lenses and then putting the lens away when not. Then the iPhone, case and all, can go back into a pocket.
Related: Also check out our Tech 21 Impact Shield For iPhone 5 review, if you need a good quality screen protector.
Of course if you have the “handle” attached, it’s not going to fit in a pocket as easily (or at all), but considering that you can attach the “handle” in about 10 seconds, what’s the big deal? For most folks, you’ll just leave the handle off and maneuver the iPone in the usual manner. Of course if you have a small tripod or one of those “Gorilla” style clamping tripods, now you’ve many times more options for how the camera on the iPhone can be braced. Most will find that a picture is always improved when it can be braced — this can be as simple as holding it and exhaling before shooting too. Start thinking of the iPhone’s camera as a “dedicated” camera to use it more effectively is the name of the game here. And using the iPro Lens System not only makes that more evident, but more usable as well.
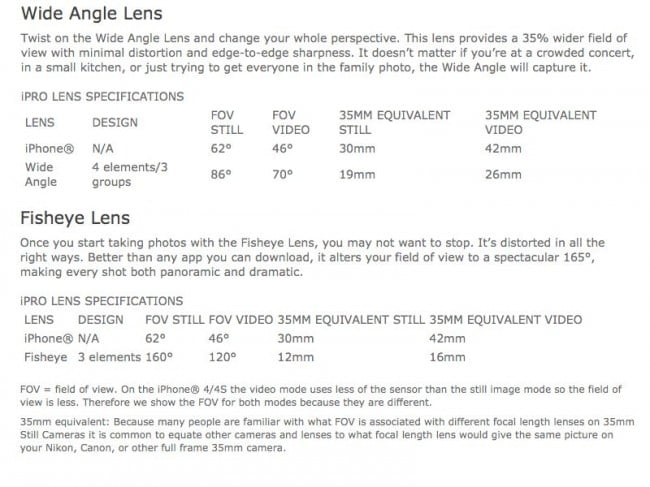
Now in use, the two lenses in the kit provide for specific field of vision changes: the wide angle increase the field of view, as compared to the iPhone’s lens, by a factor of around 35%. Try shooting inside a small room without and then with the w/a lens and the additional imaging you can now see is pretty obvious. The fisheye broadens that view even more — realistic imaging fades away here — so consider this “too much wide angle is never enough.” I personally never found dozens of times when a fisheye was the lens of choice for shooting — but when you’re shooting for fun and to express yourself, it’s true that this lens will allow for some pretty startling opportunities. Especially in crowds of people. As is always the case, it’s the person doing the shooting — not the technology — that makes the picture. Shooting a gym filled with exercise equipment from the floor looking up with a fisheye will give you a view not normally seen, for sure. The iPro Lens System gives you the tools, but it’s up to you how they’ll be used. Oh, the lenses are labeled on the side for easy referencing if you need it too. And obviously they’re of a quality that doesn’t degrade the quality of the lens built-into the iPhone. You’re not paying for plastic here. Or cheap glass either.
Now I’d be remiss if I didn’t add that these are precision lenses and need to be treated as such. That not only means treating them with care and avoiding touching the lens like crazy, but regularly providing some maintenance on them to keep them clean and dust and dirt-free. The nominal equipment used for camera lens maintenance will work fine here — if you spray glass cleaner on one of the lenses and then wipe it with your T-shirt, well, you didn’t because you know better, right? Keeping the lenses in the “handle” when not in use makes ultimate sense. And in case you wondered, since the case covers up the LED light, you can not use illumination when shooting. Turn it off and save some battery power while you’re at it.
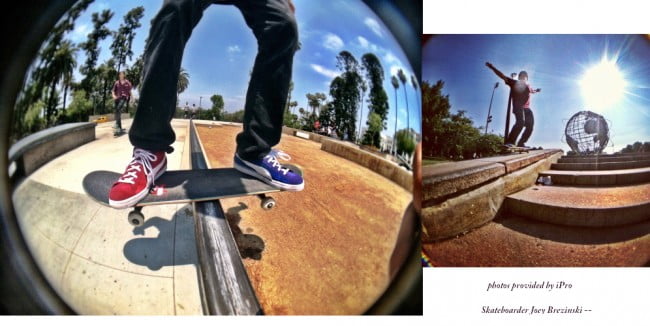
The examples below are done by ipro and show the fisheye and wide angle in action.
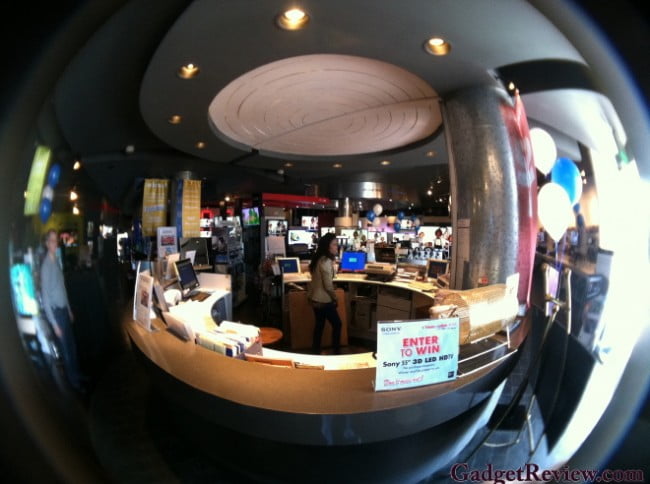
The pictures above display the characteristics you can get with the lenses: the fisheye obviously being more dramatic, but the wide angle provides more “real estate” than available with the iPhone’s built-in lens.
So using this as a guide, I mounted the case on an iPhone 4 and walked around a store, using the widfe angle lens. As can be seen from the example below, the wide angle gives you more “room” to play with, within cramped spaces.
As for the fisheye, it’s as much fun walking around and looking at the screen as it is to actually take a picture.
I should also mention that you can use these lenses to “mix it up” when shooting video: the wide angle will give you more flexibility when shooting in a smaller location, while the fisheye will just make everything look wild at your next Thanksgiving dinner or night out with the in-laws.
Editor’s Rating:
[rating:4/5]
Great
Bottom line: That the iPro Lens System provides alternate fields of vision through two precision high-resolution auxiliary lenses is a good thing. But that the lenses are encased in a carry-all that doubles as a stabilizing handle or tripod mount makes it even better. The iPro Lens System provides a feature-set for those who are serious at getting the best imaging from their iPhone’s built-in camera as possible. The retail cost of $189 is definitely in the ballpark for what you are getting to use. The quality and uniqueness of the photos you can now take is up to you.
Pros
- Lenses can be carried around safely when not in use
- Quick mounting system
Cons
- Cost will be off-putting to some
