The toaster oven is one of the best kitchen appliances we use.
The Breville Smart Oven Pro easily ranks as one of the best toaster ovens that I’ve ever tested…but it isn’t without its flaws. Not only that, it also pushes the top end of the budget spectrum, costing $265 on Amazon which will likely cause many to consider cheaper options. If you are looking for a microwave instead, the Whirlpool WMH31017AW – Best Small Over the Range Microwave is a good one.
But as I see it, investing in the Breville Smart Oven Pro is worthwhile. Why so? Well in short, it can replace your full size oven (and save you on energy costs in the meanwhile), functions like a high end appliance, has 1,800 watts of power, a whole mess of cooking options and fairly consistently toasted toast, browned food and more. For another high quality toaster oven, you should also read our Cuisinart TOB-260N1 toaster oven review. Or, check out our best toaster oven list.
So keep reading my Breville Smart Oven Pro review to learn more. Or, head on over to our Brava Oven Review for a toaster oven upgrade.
Overview
Price: $260+ on Amazon
Availability: October 1, 2013
Model #: BOV845BSS
WHY IT’S A TOP PICK: The Breville Smart Oven Pro isn’t a toaster oven, it’s an oven to replace your full size oven.
Summary: Temperature issues aside, the Breville Smart Oven Pro feels and operates like a high end (toaster) oven. And at this price point it should. It’s powerful and versatile enough to replace your full sized oven, save for the fact that it only ships with one rack and can’t fit a 9 x 13″ baking pan.
What We Liked
- Can easily and unequivocally replace your full sized oven
- Intuitive controls
- Feels and looks high end
- Temperature accurate (despite preheat tone confusion – see my testing section for more on this)
What We Didn’t
Temperature preheat accuracy is questionable; 450° F preheat tone sounded but thermometer showed 300° F.Update: According to Breville this was actually done with purpose. You can see the full explanation in the comments, but in short, Breville determined the total preheat time is less if you put your items in earlier due to the delta that occurs when the door is opened.- Doesn’t fit a 9 x 13″ pan
Design
Interior space of the Breville Smart Oven Pro is .8 cubic feet. That’s slightly less than Cuisinart’s comparable toaster oven offering. And while it may seem moot, and largely is, the biggest caveat is that you cannot fit a 9 x 13″ pan inside. And yes, the Cuisinart’s competition can. Which for some could be a non-starter, especially if you’re a big baker. I am not, but I did have one instance where upon I couldn’t us my 9 x 13″ to bake a gluten free chocolate cake.
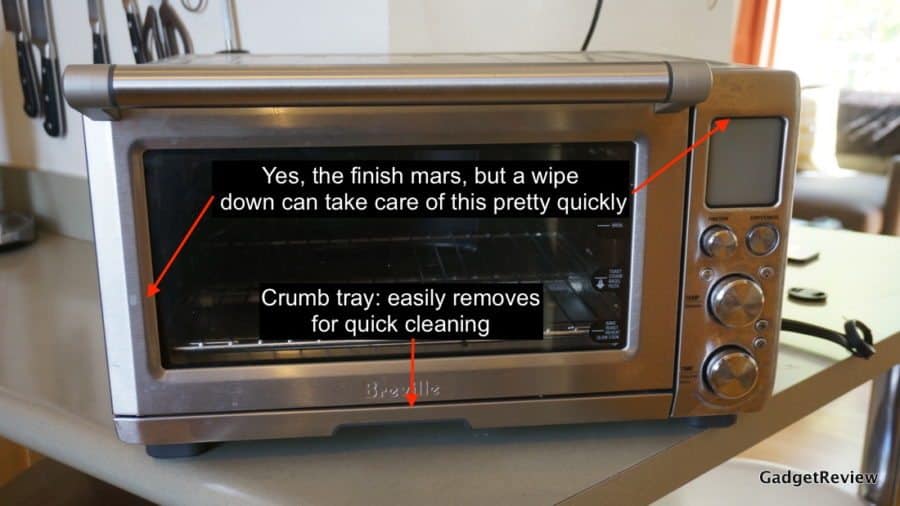
And like the Cuisinart, the Breville is clad in stainless steel all around. Leaving items, such as trays or the included pizza tray (metal not ceramic as found with the Cuisinart) will leave a slight discoloration on top. And like all other toaster ovens, this one will get hot to the touch, so you’ll have to look out for little ones and their curios hands.
As for footprint, the Breville measures 15¾ x 18½ x 11″. It’s a fair bit smaller than the Cuisinart and with that comes room for 6 slices of toast, 3 less then the competition. That in mind, note the height size and make sure that this unit will fit under your cabinets. I had no issues with the space in my kitchen, but not all homes are built equally.
Related: Also check out our Compact Smart Oven review.
On the inside you’ll find a non-stick surface that makes for easy wipe downs. Though I still can’t help but wonder what a year or two of use will result in.
There is an interior light, which in my book is a must. That said, Breville makes another version of this oven called the Smart Oven Plus and the only real difference, based on their product page, would seem to be a lack of interior light in the latter product. So suffice to say, spending the extra $20 or so dollars is money well spent. Just keep in mind, you’ll want to wipe down the light regularly to maintain visibility.
And last, and most certainly not least, are the 5 independent quartz heating elements. I mentioned these in my Cuisinart TOB-260N1 review, but in short, these provide infrared cooking which is ideal for searing food while maintaining moisture, or moistness, because the air doesn’t have to heat for the food to begin to cook. Instead, the uncooked food directly absorbs the radiation and begins to cook.
Operating the Breville Smart Oven Pro
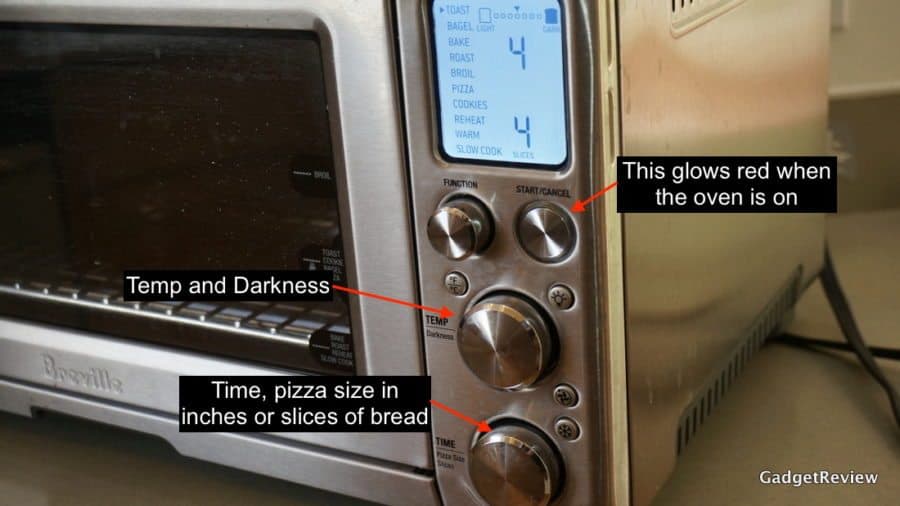
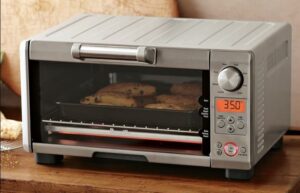
Operating the Breville Smart Oven Pro is intuitive and easy to do, no matter your knowledge of cooking. There is an easy to read LCD display, which turns from blue to red when the machines is toasting, baking etc.
To control the settings there are a total of three knobs and one button. Well, truthfully there are also 4 small buttons: one to activate additional time for frozen foods (such as bread), a convection oven button, a light button and a button to switch between Celsius and Fahrenheit.
The single, large button turns the machine on and off.
The smallest knob, located at the top of the control panel, allows you to select from 1 of 10 cooking function (Toast, Bagel, Bake, Roast, Broil, Pizza, Cookies, Reheat, Warm, Slow cook), where as the remaining knobs, in descending order, allow you to influence temp/darkness and time/slices.
The faster you move each knob, depending on the cooking function, the faster the display’s number will increase (or decrease). So sometimes it can be a bit finicky when it comes to nailing down the correct temperature, slices or time.
Total cooking time, for baking and roasting, maxes out at 2 hours. For slowing cooking you can achieve up to 10 hours of cooking. And in the case of broiling, you’ll be capped at 20 minutes of cooking time.
The limited broiling timer can be an annoyance, especially when you’re preheating the function and still prepping food. I generally resort to powering the machine down then up (very quickly) as the timer knob will no longer increase the time from what is remaining on the display. I’m not sure if this is an energy conservation feature or that the heating elements are best not used at this intensity for periods longer than 20 minutes.
At this point, I haven’t used the slow cook function since I haven’t had a meal that has called for it. I have, however, dried some figs in the oven over the course of a few hours, at a low temp, and it was fairly effective at doing doing so.
Compared to the Cuisinart, the Breville does feel more premium in both function and slightly form. Granted Breville doesn’t include a ceramic pizza stone in their accessory pack, but they do offer virtually the same, albeit smaller, 12 x 12″ enamel baking pan. It can also fit a 13″ pizza, as there is slight bubble in the back to accommodate.
Unlike the Cuisinart, the Breville has a set of magnets that pull the rack out of the oven slightly, provided it’s located in the middle position. It doesn’t make the machine but it’s a nice touch. As are the knobs, which exude a nice clicking feeling that feels more premium than the Cuisinart offering. In short, the Breville just feels more solid and premium than the competition.
Cleaning the Breville Smart Pro
Lastly, cleaning the Breville Smart Oven Pro is pretty pain free, at least so far. I’ve had cheese drip all over the rack and bottom (crumb tray) and I’m happy to report it all wipes off quick and easy. The bottom of the oven, the crumb tray, removes for easy cleaning. It’s sturdy and is hidden when it’s back in its home.
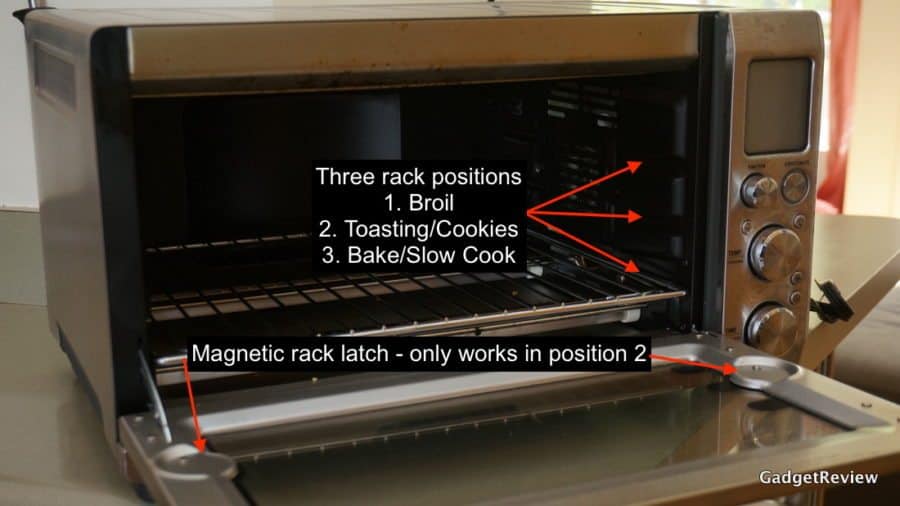
I recommend wiping down the glass door after each use, or every other use to prevent food residue from building up and cooking into place. If you don’t, it can reduces the glass door’s intended purpose.
Testing and Results
So I’d be remiss if I didn’t perform a few objective tests to see how the Breville compares to the competition.
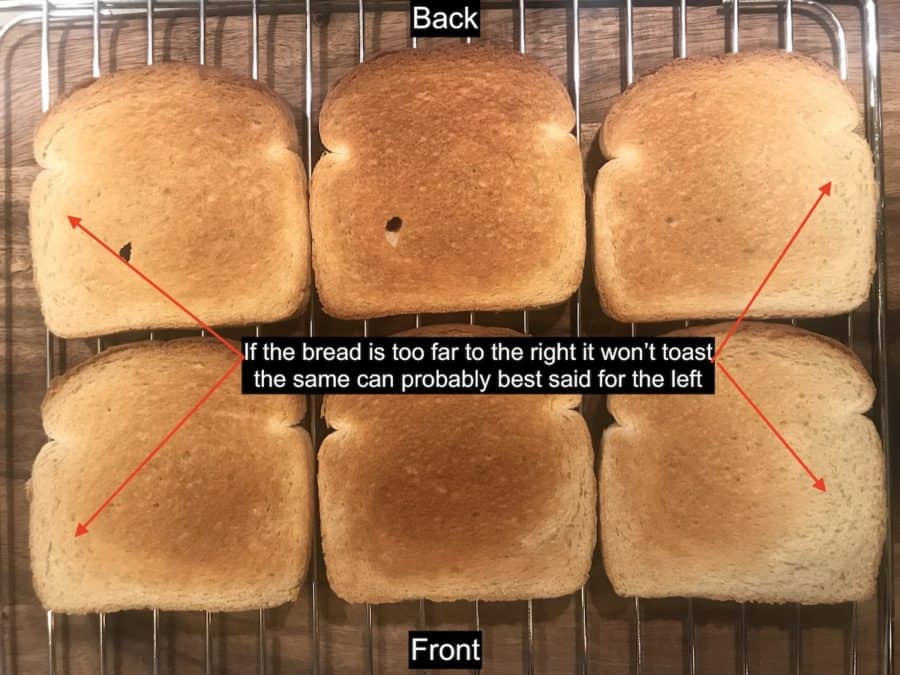
First up is the heat map. I used 6 slices of white bread (Sara Lee) to measure not only the heat distribution but the time it took to achieve what I generally like to refer to as good toast, or visually speaking, that ideal golden brown. Time to achieve this for 6 slices: 4:30. Keep in mind the less toast, the quicker it might be.
And you can see below the toaster’s heat map. It performs admirably, but lacks heat on the left and right sides. In this instance (picture), the bread was pushed slightly more to the right, hence why that side isn’t as toasted as the left.
The next test is temperature accuracy and timing. As for accuracy, I’m looking to see if the preheat function – which sounds a tone when it’s reached the inputted temperature – is accurate, and how long it takes using this Thermometer (the same thermometer in all our toaster testing). I’m also looking to see how long takes to achieve select increments of temperature as well as measure the max temperature.
In the case of the Breville, it sounded the preheat beep after 4:56 minutes for 450° degrees when the our thermometer only showed 300° F. Disappointing? Indeed. BUT WAIT…KEEP READING.
Update: Richard from Breville reached out to address this issue. To paraphrase, Breville sounds the preheat tone early on purpose. Why? After testing, the found at the they netted less preheat time if the food was put in earlier since less heat was sacrificed at a lower temperature when the door is opened (opening any oven door lets out heat). Here is his full comment if you’re interested:
“Thanks for a really useful review. I worked on the Breville BOV845 Smart Oven project. You mentioned the pre-heat tone sounding when the oven had not reached full temp. This seems like the oven temperature is not accurate, but this is actually a deliberate feature. Allow me to explain. We wanted to make the pre-heat time as short as possible. While we were developing the product we graphed the temperature in the cavity. To pre-heat the oven to 450 F takes 10 minutes. When you open the door to put the food inside the oven cavity temperature drops dramatically (~120 F) and it takes a further 2.5 minutes at full power to recover to 450 F making the total heatup time 12.5 minutes.
We tried other options and discovered that if the food is put in at 5 minutes when the temperature is lower, the amount the temperature drops is less (about 60F) so then you then reach 450 F in 10 minutes which is 2.5 minutes faster! For this reason we made the pre-heat alert sound at 75% of the target temp in order to get you baking 2 minutes and 30 seconds sooner!”
You can see the remaining temps and the amount of time it took below. Lastly, the oven, while set to its max temp on bake of 450° F, was never achieved according to our thermometer, but it did come close at 440° F after over 15 minutes of preheating.
- 350°F: 5:46 minutes
- 400°F: 7:36 minutes
- 425°F: 9:30 minutes
- 440°F: 15 minutes
- 450°F: n/a – we could never reach this temperature according to our thermometer
- Preheat accuracy
- Oven set to 450° but according to our thermometer it was 300°F at 4:56.
Lastly, and this is important, the Breville’s thermometer is in fact accurate. I set the oven to 400°F for 15 minutes, stuck the thermometer in, and it too read the same temperature.
Wrap Up
Temperature preheat inaccuracies aside, the The Breville Smart Oven Pro easily delivers the most premium experience of all the toaster ovens I’ve tested. I can live with the delta found during preheating as it’s by design on the part of Breville more a matter of waiting, though in my mind it does some what defeat the feature’s purpose.
If I could change one anything, it would be the Smart Oven Pro’s capacity. Not it’s overall capacity, but it’s width. It’s just a few centimeters shy of being able to fit a 9 x 13″ pan.
Related Articles:
